
Help & Knowledge Base
Customizing Result File Names
Special keywords can be used as placeholders in the output file names, to be replaced with dynamic values during the execution.
A trivial example is prefixing each document with the page number, when splitting.
[CURRENTPAGE]
A reference to the current page number in the input document.
Example: [CURRENTPAGE###] will generate filesnames like 001.pdf, 002.pdf.
Example: [CURRENTPAGE##] generates 01.pdf, 02.pdf, etc.
[TIMESTAMP]
Ensures unique output filenames, being replaced with current date & time.
[FILENUMBER]
Ensures unique output filenames, replaced with a file number according to the output order.
Example: [FILENUMBER###] generates 001, 002
Example: [FILENUMBER13] starts with the counter at 13, generating 13, 14,
etc.
[BASENAME]
Does not ensure unique output filenames, and it must be used together with other placeholders ensuring unique names. It is replaced with original name of the input document, without the extension.
Example: [CURRENTPAGE]_[BASENAME] would generate 1_input-file.pdf, 3_input-file.pdf,
etc.
[BOOKMARK_NAME]
This pattern is replaced by current bookmark's name. Only applicable in the "Split by bookmarks" tool.
[BOOKMARK_NAME_STRICT]
Same behavior as [BOOKMARK_NAME] with the difference that non-alphanumberic characters are
removed.
Example: [CURRENTPAGE]-[BOOKMARK_NAME] would generate 1-Introduction.pdf, 4-Chapter
1.pdf, etc.
[TEXT]
This pattern is applicable only in the "Split by text" tool. It is replaced with the text found in the page area selected.
Example: [CURRENTPAGE]-[TEXT] would generate 1-Invoice 3456789.pdf, 4-Invoice
234567.pdf, etc.
[TEXT1], [TEXT2], etc.
This pattern is applicable only in the "Rename" tool. It is replaced with the text found in the selected area.
Example: [TEXT2]-[TEXT1] would generate John Doe-Invoice 3456789.pdf, Jane Doe-Invoice
234567.pdf, etc.
Sejda Desktop Enterprise Install
To deploy Sejda Desktop in an enterprise environment using a pre-configured volume license key use this command:
msiexec /i sejda-desktop_x.y.z_x64.msi LICENSE_KEY="1234-ABCD-1234-ABCD"
Any options provided will be configured machine-wide and will apply for all users on the system.
| LICENSE_KEY | License key | LICENSE_KEY="1234-ABCD-1234-ABCD" |
| LOCALE | UI language | en, es, de, fr,it or pt |
| UPDATE_CHECK | Disables checking for new versions | UPDATE_CHECK="false" |
| DISABLED_FEATURES | List of features to be disabled | DISABLED_FEATURES="edit.whiteout" |
| EULA_ACCEPTED | Accept EULA and no longer prompt on first use | EULA_ACCEPTED="true" |
| AUTO_REPORT_ERRORS | Configure automated error reporting and no longer prompt on first use | AUTO_REPORT_ERRORS="false" |
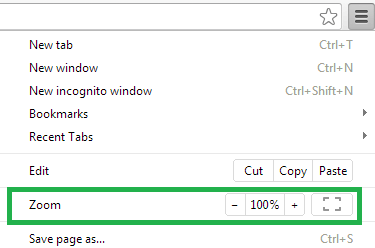
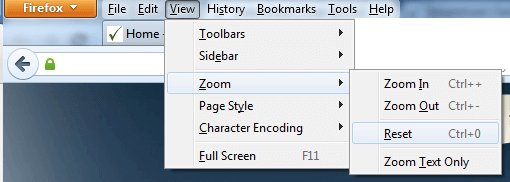
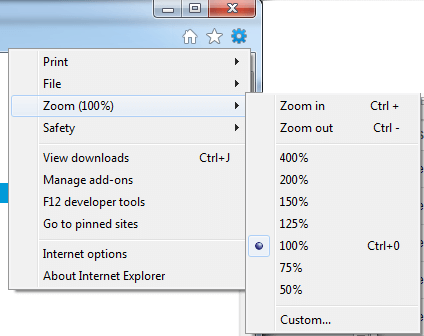
Resetting Browser Zoom
Choosing a zoom level of anything other than 100% (the default) can cause problems in pages where we render PDF pages.
If you are warned about it, reset the browser zoom to 100%.
The quickest way to return your browser to this zoom setting is to use the keyboard shortcut Ctrl + 0 on Windows or Cmd + 0 on Mac.
Additional browser-specific instructions for changing the zoom level are detailed below.
Chrome
Firefox
Internet Explorer
Safari

Sejda Desktop - Loading local fonts failed
Sejda Desktop fails to load the fonts installed on your system?
Windows 7: Please install "Platform update for Windows 7 SP1": https://support.microsoft.com/en-us/kb/2670838.
Linux: Please install libfontconfig-dev: sudo apt-get install libfontconfig-dev
Sejda Desktop - Add your fonts
Sejda Desktop can use your custom fonts when editing PDF documents.
1) Install the font on your system. See help for Windows or Mac.
2) Open Sejda Desktop, then open a PDF document with the Editor.
3) Type text on the page. From the context menu select "Fonts > More fonts".
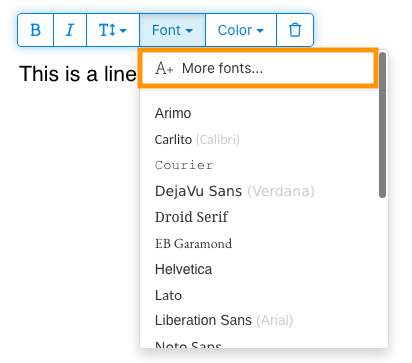
4) Select the font you would like to use and click "OK".
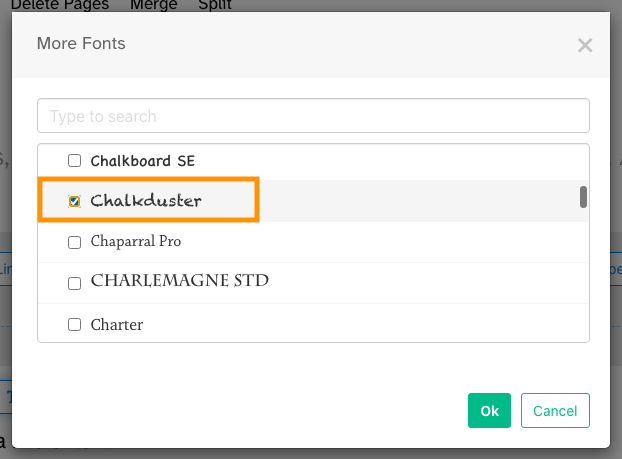
5) Click on the newly added font to use it for your text.

How long does it take for a refund to be processed?
It can take anywhere from 5-10 business days for a refund to show up on your bank account.
In some cases, the refund might be processed as a reversal, meaning the original payment will disappear from the account statement entirely and the balance will reflect as though the charge never occurred.
If you do not see the refund after 10 business days and you are still seeing the original charge on your bank statement, please reach out to support for more information.
How can you delete your FastSpring data?
If you've placed an order through FastSpring, our online authorized reseller & merchant of record, you can send your data erasure request to privacy@fastspring.com.
Malwarebytes interfering with Sejda Desktop?
Do you have Malwarebytes installed?
Please try temporarily turning Malwarebytes off and see if that solves the problem: Instructions here
You can report this problem with Malwarebytes: Report false positive
Could not convert: Page uses CAPTCHAs
The website you are trying to convert uses CAPTCHAs to block automated robots (such as our converter) from visiting their website.
There is no work around this.
See if the browser extension helps with your use-case:
HTML to PDF browser-extension
Install Linux OCR engine
Sejda Desktop does not ship with an embedded OCR engine on Linux, it uses the one available on the system.
To install an OCR engine, please run the following command:
sudo apt-get install -y tesseract-ocr tesseract-ocr-all
Once the command completes, return to Sejda Desktop and run your OCR task again.
Install Linux OCR language data
The OCR engine is installed successfully, but it is missing language data.
To install language data, please run the following command:
sudo apt-get install -y tesseract-ocr-all
About 667M of data will be downloaded and installed.
Once the command completes, return to Sejda Desktop and run your OCR task again.
소유자 비밀번호를 입력하라는 메시지가 표시됩니다
왜 비밀번호를 묻나요?
일부 PDF 문서는 인쇄, 텍스트 복사, 편집 또는 주석 추가와 같은 특정 작업을 제한하는 보안 설정이 포함되어 있습니다. 이러한 제한은 문서 작성자가 콘텐츠 사용 및 공유 방식을 제어하기 위해 설정한 것입니다.
PDF에 이러한 제한이 있음을 감지하면 소유자 비밀번호를 요청합니다. 이 비밀번호를 입력하면 문서 잠금이 해제되고 모든 기능과 권한에 대한 전체 액세스 권한이 부여됩니다. 이 단계는 승인된 사용자만 원본 작성자가 설정한 제한 사항을 수정하거나 제거할 수 있도록 보장합니다.
소유자 비밀번호란 무엇인가요?
소유자 비밀번호는 PDF 작성자가 문서에 대한 무단 변경을 방지하기 위해 설정한 것입니다. 문서를 여는 것 자체를 제한하는 사용자 비밀번호와는 다릅니다. 소유자 비밀번호가 있다면 문서에 대한 전체 권한이 있다는 뜻입니다.
소유자 비밀번호가 없으면 어떻게 되나요?
소유자 비밀번호가 없으면 PDF에 설정된 제한 사항에 따라 계속해서 제한된 액세스 권한만 갖게 됩니다.
전체 액세스 권한을 얻으려면 잠금이 해제된 버전의 문서를 구하세요.
매번 소유자 비밀번호를 반복해서 입력하지 않으려면 어떻게 해야 하나요?
PDF unlocker 도구를 사용하여 문서에서 권한 제한을 제거할 수 있습니다. 이 작업은 한 번만 수행하면 됩니다. 그러면 더 이상 해당 문서에 대해 소유자 비밀번호를 요청받지 않습니다.
Google Chrome에서 PDF 문서를 열고, Ctrl+P를 눌러 인쇄를 선택한 다음, 오른쪽 상단에서 "Destination"을 "Save as PDF"로 선택하고 "저장"을 클릭하세요.
유료 플랜을 구매하면 문제가 해결되나요?
아니요, 유료 플랜을 사용하더라도 소유자 비밀번호를 입력해야 합니다.
소유자 비밀번호를 알려줄 수 있나요?
아니요, 저희는 귀하의 문서에 대한 소유자 비밀번호를 알지 못합니다. 소유자 비밀번호는 문서를 작성한 사람이 설정한 것이며, 로그인 비밀번호와는 다릅니다.
스캔한 문서를 편집하거나 변환할 수 없습니다
왜 스캔한 문서는 편집하거나 변환할 수 없나요?
종이 문서를 스캔하여 PDF를 만들 때 스캐너는 각 페이지의 이미지를 캡처합니다. 이 과정에서 텍스트, 그래픽, 레이아웃이 PDF 내에 삽입된 단일 이미지 파일로 변환됩니다. 텍스트가 개별 문자와 줄로 저장되는 일반 PDF와 달리, 스캔된 PDF는 각 페이지를 하나의 큰 그림으로 처리합니다.
스캔된 PDF의 텍스트는 이미지의 일부이므로 PDF 편집기가 이를 직접 인식하거나 수정할 수 없습니다. 소프트웨어는 구별 가능한 글자나 단어가 아닌 픽셀 덩어리만 보게 됩니다. 이로 인해 일반적인 텍스트 기반 PDF 문서처럼 텍스트 단락을 편집하거나 변경하는 것이 불가능합니다.
문서가 스캔본인지 어떻게 확인하나요?
PDF가 스캔된 이미지인지 확인하는 한 가지 방법은 PDF 뷰어로 문서를 열어 마우스로 텍스트를 선택해 보는 것이에요.. 편집 가능한 PDF에서는 마우스 커서를 클릭하고 드래그하여 텍스트를 강조할 수 있어요.. 텍스트를 전혀 선택할 수 없고 페이지 전체가 하나의 이미지처럼 작동한다면, 스캔된 문서일 가능성이 높아요..
참고: 일부 스캔 문서는 OCR(광학 문자 인식) 처리를 통해 텍스트 선택 및 검색이 가능한 "searchable" 스캔본이 되기도 해요.. 하지만 이런 문서들도 여전히 스캔본이며 일반 PDF처럼 편집하거나 변환할 수 없어요..
제 문서는 확실히 스캔본이 아니에요.
일부 문서는 콘텐츠가 각 페이지에 이미지로 삽입되어 있어 스캔본처럼 보일 수 있어요.. 스크린샷으로 만든 문서나 텍스트가 편집 가능한 텍스트 대신 외곽선(outlines)으로 변환된 경우 이런 일이 발생할 수 있어요..
기술적으로는 스캔본이 아니지만, 기능상으로는 비슷하게 작동해요.. 아쉽게도 이런 유형의 문서는 편집이나 변환을 지원하지 않아요..
유료 플랜을 구매하면 문제가 해결되나요?
아니요, 유료 플랜으로 업그레이드해도 스캔된 문서를 편집하거나 변환할 수는 없어요.. 구독 등급과 관계없이 스캔본 편집이나 변환은 지원되지 않아요..
이전에는 이 문서를 편집할 수 있었어요.
저희는 스캔된 문서의 편집이나 변환을 지원한 적이 없어요.. 이전에 편집이 가능했다면, 현재 문서와는 다른 방식으로 PDF를 내보냈을 가능성이 커요..
권한 문제로 Sejda Desktop 실행에 실패했어요.
이 오류에는 두 가지 일반적인 원인이 있어요: 권한 부족 또는 백신 프로그램의 간섭..
권한 부족: Sejda Desktop을 관리자 권한으로 실행해야 할 수도 있어요.. 앱을 마우스 오른쪽 버튼으로 클릭한 후 "자세히" > "관리자 권한으로 실행"을 선택하세요..
백신 또는 보안 소프트웨어: 문제가 해결되는지 확인하려면 백신 프로그램을 일시적으로 비활성화해 보세요..
Chromebook에 Sejda Desktop 설치하기
Sejda Desktop은 Linux 개발 환경(Crostini라고도 함)을 사용하여 Chromebook에 설치할 수 있어.
요구 사항
Chromebook에서 Linux 개발 환경이 활성화되어 있어야 해. 활성화하려면 설정 → 고급 → 개발자 → Linux 개발 환경으로 가서 설정 단계를 따라해.
모든 Chromebook이 Linux를 지원하는 건 아니야. 구형이나 저사양 모델은 이 옵션을 사용할 수 없을지도 몰라.
1. Linux (.deb) 버전 다운로드
2. 터미널에서 설치해
Linux 터미널 앱을 열고 실행해:
cd ~/Downloads
sudo dpkg -i sejda-desktop_*.deb
sudo apt -f install
3. 실행하기
sejda-desktop
아니면 ChromeOS 런처의 Linux 앱 폴더에서 실행해.
문제 해결: 앱이 열리지 않을 때
Sejda Desktop이 나타나지 않거나 창이 열리지 않으면, 누락된 GUI 라이브러리를 설치해:
sudo apt install -y libgconf-2-4 libatk1.0-0 libatk-bridge2.0-0
OCR 기능
Linux용 Sejda Desktop은 시스템 OCR 엔진을 사용해.
안내는 Install Linux OCR engine을 참고해